Create a generated project
Create a generated project
Section titled “Create a generated project”The easiest way to get started with Tuist in any directory or in the directory of an existing project:
mise x tuist@latest -- tuist inittuist initThe command will walk you through the steps to
Add dependencies
Section titled “Add dependencies”It’s common for projects to depend on third-party libraries to provide additional functionality. To do so, run the following command to have the best experience editing your project:
tuist editAn Xcode project will open containing your project files. Edit the Package.swift and add the
import PackageDescription
#if TUIST    import ProjectDescription
    let packageSettings = PackageSettings(        // Customize the product types for specific package product        // Default is .staticFramework        // productTypes: ["Alamofire": .framework,]        productTypes: [:]    )#endif
let package = Package(    name: "MyApp",    dependencies: [        // Add your own dependencies here:        // .package(url: "https://github.com/Alamofire/Alamofire", from: "5.0.0"),        // You can read more about dependencies here: https://docs.tuist.io/documentation/tuist/dependencies        .package(url: "https://github.com/onevcat/Kingfisher", .upToNextMajor(from: "7.12.0")) // [!code ++]    ])
Then edit the application target in your project to declare Kingfisher as a dependency:
import ProjectDescription
let project = Project(    name: "MyApp",    targets: [        .target(            name: "MyApp",            destinations: .iOS,            product: .app,            bundleId: "dev.tuist.MyApp",            infoPlist: .extendingDefault(                with: [                    "UILaunchStoryboardName": "LaunchScreen.storyboard",                ]            ),            buildableFolders: [                "MyApp/Sources",                "MyApp/Resources",            ],            dependencies: [                .external(name: "Kingfisher") // [!code ++]            ]        ),        .target(            name: "MyAppTests",            destinations: .iOS,            product: .unitTests,            bundleId: "dev.tuist.MyAppTests",            infoPlist: .default,            sources: ["MyApp/Tests/**"],            resources: [],            dependencies: [.target(name: "MyApp")]        ),    ])
Then run tuist install to resolve and pull the dependencies using the Swift Package Manager.
Visualize the project
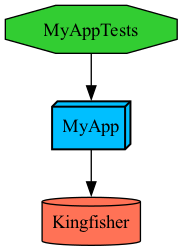
Section titled “Visualize the project”You can visualize the project structure by running:
tuist graphThe command will output and open a graph.png file in the project’s directory:
Use the dependency
Section titled “Use the dependency”Run tuist generate to open the project in Xcode, and make the following changes to the ContentView.swift file:
import SwiftUIimport Kingfisher // [!code ++]
public struct ContentView: View { public init() {}
public var body: some View { Text("Hello, World!") // [!code --] .padding() // [!code --] }}
struct ContentView_Previews: PreviewProvider { static var previews: some View { ContentView() }}Run the app from Xcode, and you should see the image loaded from the URL.