Create a generated project
Create a generated project {#create-a-generated-project}
Section titled “Create a generated project {#create-a-generated-project}”The easiest way to get started with Tuist in any directory or in the directory of an existing project:
::: code-group
mise x tuist@latest -- tuist inittuist init:::
The command will walk you through the steps to
::: info MIGRATE AN EXISTING PROJECT
If you want to migrate an existing project to generated projects to improve the developer experience and take advantage of our
:::
Add dependencies {#add-dependencies}
Section titled “Add dependencies {#add-dependencies}”It’s common for projects to depend on third-party libraries to provide additional functionality. To do so, run the following command to have the best experience editing your project:
tuist editAn Xcode project will open containing your project files. Edit the Package.swift and add the
import PackageDescription
#if TUIST    import ProjectDescription
    let packageSettings = PackageSettings(        // Customize the product types for specific package product        // Default is .staticFramework        // productTypes: ["Alamofire": .framework,]        productTypes: [:]    )#endif
let package = Package(    name: "MyApp",    dependencies: [        // Add your own dependencies here:        // .package(url: "https://github.com/Alamofire/Alamofire", from: "5.0.0"),        // You can read more about dependencies here: https://docs.tuist.io/documentation/tuist/dependencies        .package(url: "https://github.com/onevcat/Kingfisher", .upToNextMajor(from: "7.12.0")) // [!code ++]    ])
Then edit the application target in your project to declare Kingfisher as a dependency:
import ProjectDescription
let project = Project(    name: "MyApp",    targets: [        .target(            name: "MyApp",            destinations: .iOS,            product: .app,            bundleId: "dev.tuist.MyApp",            infoPlist: .extendingDefault(                with: [                    "UILaunchStoryboardName": "LaunchScreen.storyboard",                ]            ),            buildableFolders: [                "MyApp/Sources",                "MyApp/Resources",            ],            dependencies: [                .external(name: "Kingfisher") // [!code ++]            ]        ),        .target(            name: "MyAppTests",            destinations: .iOS,            product: .unitTests,            bundleId: "dev.tuist.MyAppTests",            infoPlist: .default,            sources: ["MyApp/Tests/**"],            resources: [],            dependencies: [.target(name: "MyApp")]        ),    ])
Then run tuist install to resolve and pull the dependencies using the Swift Package Manager.
::: info SPM AS A DEPENDENCY RESOLVER
Tuist recommended approach to dependencies uses the Swift Package Manager (SPM) only to resolve dependencies. Tuist then converts them into Xcode projects and targets for maximum configurability and control.
:::
Visualize the project {#visualize-the-project}
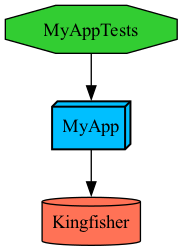
Section titled “Visualize the project {#visualize-the-project}”You can visualize the project structure by running:
tuist graphThe command will output and open a graph.png file in the project’s directory:
Use the dependency {#use-the-dependency}
Section titled “Use the dependency {#use-the-dependency}”Run tuist generate to open the project in Xcode, and make the following changes to the ContentView.swift file:
import SwiftUIimport Kingfisher // [!code ++]
public struct ContentView: View { public init() {}
public var body: some View { Text("Hello, World!") // [!code --] .padding() // [!code --] }}
struct ContentView_Previews: PreviewProvider { static var previews: some View { ContentView() }}Run the app from Xcode, and you should see the image loaded from the URL.