创建生成的项目
在任何目录或现有项目目录中开始使用 Tuist 的最简单方法:
mise x tuist@latest -- tuist inittuist init该命令将引导您完成
项目通常依赖第三方库来提供附加功能。为此,运行以下命令以获得最佳的项目编辑体验:
tuist edit将打开一个包含您项目文件的 Xcode 项目。编辑 Package.swift 并添加
import PackageDescription
#if TUIST    import ProjectDescription
    let packageSettings = PackageSettings(        // 为特定的包产品自定义产品类型        // 默认为 .staticFramework        // productTypes: ["Alamofire": .framework,]        productTypes: [:]    )#endif
let package = Package(    name: "MyApp",    dependencies: [        // 在此处添加您自己的依赖项:        // .package(url: "https://github.com/Alamofire/Alamofire", from: "5.0.0"),        // 您可以在此处了解有关依赖项的更多信息:https://docs.tuist.io/documentation/tuist/dependencies        .package(url: "https://github.com/onevcat/Kingfisher", .upToNextMajor(from: "7.12.0")) // [!code ++]    ])
然后编辑项目中的应用目标,将 Kingfisher 声明为依赖项:
import ProjectDescription
let project = Project(    name: "MyApp",    targets: [        .target(            name: "MyApp",            destinations: .iOS,            product: .app,            bundleId: "dev.tuist.MyApp",            infoPlist: .extendingDefault(                with: [                    "UILaunchStoryboardName": "LaunchScreen.storyboard",                ]            ),            buildableFolders: [                "MyApp/Sources",                "MyApp/Resources",            ],            dependencies: [                .external(name: "Kingfisher") // [!code ++]            ]        ),        .target(            name: "MyAppTests",            destinations: .iOS,            product: .unitTests,            bundleId: "dev.tuist.MyAppTests",            infoPlist: .default,            sources: ["MyApp/Tests/**"],            resources: [],            dependencies: [.target(name: "MyApp")]        ),    ])
然后运行 tuist install 以使用 Swift Package Manager 解析和拉取依赖项。
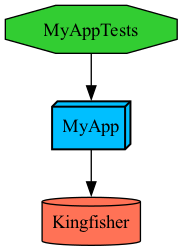
您可以通过运行以下命令来可视化项目结构:
tuist graph该命令将在项目目录中输出并打开一个 graph.png 文件:
运行 tuist generate 在 Xcode 中打开项目,并对 ContentView.swift 文件进行以下更改:
import SwiftUIimport Kingfisher // [!code ++]
public struct ContentView: View { public init() {}
public var body: some View { Text("Hello, World!") // [!code --] .padding() // [!code --] }}
struct ContentView_Previews: PreviewProvider { static var previews: some View { ContentView() }}从 Xcode 运行应用,您应该会看到从 URL 加载的图像。